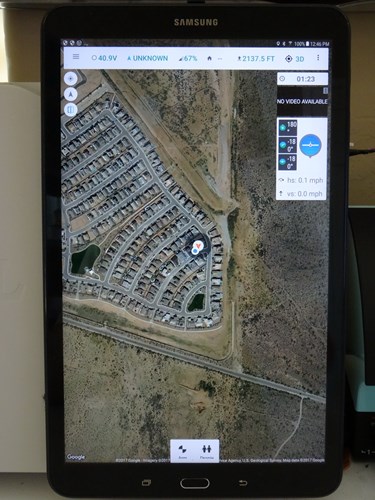
GPS TELEMETRY
This setup assumes that you have a properly set up and working Dragon Link system with the latest firmware installed. DO NOT change any of the RF or other advanced settings, this setup assumes a system in default configuration. ( You may change typical setup settings such as RC input PPM / SBUS, etc. ) If you have changed a lot of settings and do not have a default configuration anymore, you can RESTORE FACTORY SETTINGS by CLICKING HERE.
You can connect your GPS to your Dragon Link Receiver using the newer 6 Pin UEXP cable shipped with new receivers, or the older 5 Pin UEXP cable, either one will perform the same. Follow the instructions for the one you want to use below.
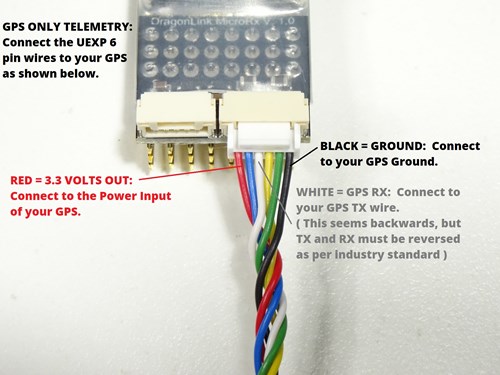
UEXP 6 Pin Cable Connection
1. Wire the 6 pin UEXP cable to your GPS as shown in the picture to the left. If your GPS has 2 data wires, and you are not sure which one to use, you can try them both. If you get the TX / RX wire backwards, it will not work, but will not damage anything.
BLACK wire is usually Ground.
RED wire is usually Power.
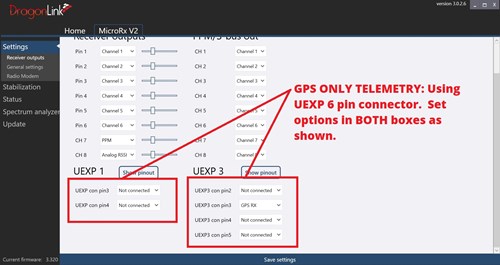
1. Connect your Dragon Link receiver to the GUI configuration utility, and click on " RECEIVER OUTPUTS " form the list on the left. Configure the options in the two red boxes as shown.
2. Click the " SAVE SETTINGS " Bar at the bottom of the page.
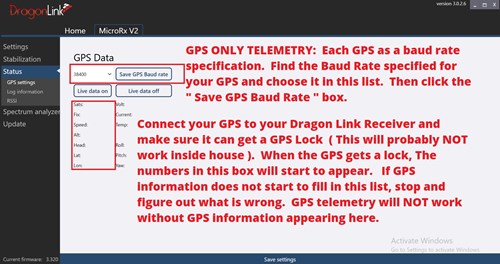
3. In the Receiver GUI Configuration tool, Click " STATUS " in the list to the left and then select the correct GPS Baud Rate as shown in the picture to the left. Different kinds of GPS units have different Baud ratings, find the correct baud rate for your GPS and enter it, then click the " Save GPS Baud Rate " box.
4. Click the " SAVE SETTINGS " bar at the bottom.
UEXP 5 Pin Cable Connection
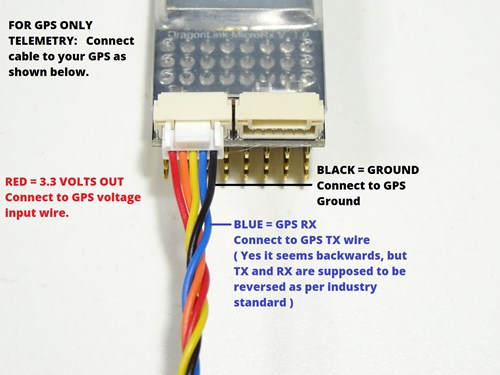
1. Wire the 5 pin UEXP cable to your GPS as shown in the picture to the left. If your GPS has 2 data wires, and you are not sure which one to use, you can try them both. If you get the TX / RX wire backwards, it will not work, but will not damage anything.
BLACK wire is usually Ground.
RED wire is usually Power.
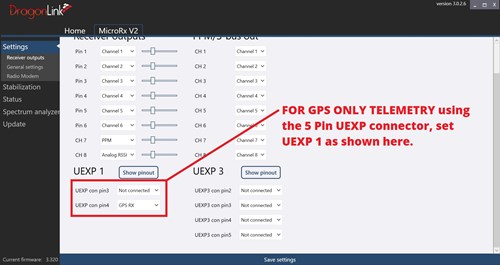
1. Connect your Dragon Link receiver to the GUI configuration utility, and click on " RECEIVER OUTPUTS " form the list on the left. Configure the options in the two red boxes as shown.
2. Click the " SAVE SETTINGS " Bar at the bottom of the page.
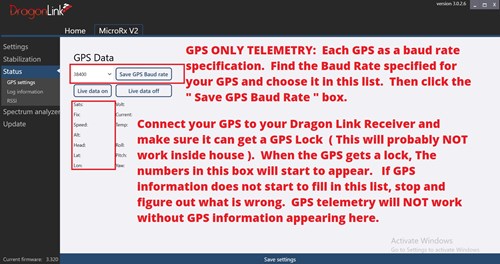
3. In the Receiver GUI Configuration tool, Click " STATUS " in the list to the left and then select the correct GPS Baud Rate as shown in the picture to the left. Different kinds of GPS units have different Baud ratings, find the correct baud rate for your GPS and enter it, then click the " Save GPS Baud Rate " box.
4. Click the " SAVE SETTINGS " bar at the bottom.
Test the GPS connection to your Dragon Link Receiver
1. Disconnect your Dragon Link Receiver from the GUI utility, then connect it again to Re-Power it.
2. Place your GPS in a place where it has GPS reception, this will usually NOT work indoors, but sometimes will. Most GPS units have an LED to indicate a valid satellite lock. It often takes a few minutes for a GPS unit to get a valid satellite lock.
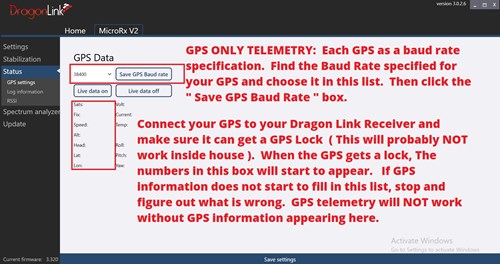
3. Click " Status " on the left of the GUI, and then click " Live Data On " box. When your GPS is wired correctly, and has a valid satellite lock, GPS data will start to fill in the blank spaces below. If you see GPS data there, this confirms your GPS is connected properly to your Dragon Link receiver, and will work for GPS Telemetry.
1. This test assumes you have the DEFAULT ADVANCED RF settings in the transmitter. You can change the channel and other settings as needed, but the RF and advanced settings must be the default settings. If you have accidentally changed the advanced RF settings, you easily set everything back to default. If needed, CLICK HERE for instructions to " RESTORE FACTORY SETTINGS " to your transmitter and then REBIND the system.
2. Power on your Dragon Link TRANSMITTER normally, and power on your Dragon Link Receiver. You MUST you have a valid telemetry connection as indicated by the BLUE LED on the Dragon Link Transmitter to proceed to the next steps.
3. Place the Dragon Link Receiver and its GPS outside so that the GPS will get a valid satellite lock. Give the GPS a few minutes to obtain a position.
4. Connect your Dragon Link Transmitter to your computer using the USB port and open the Dragon Link configuration program.
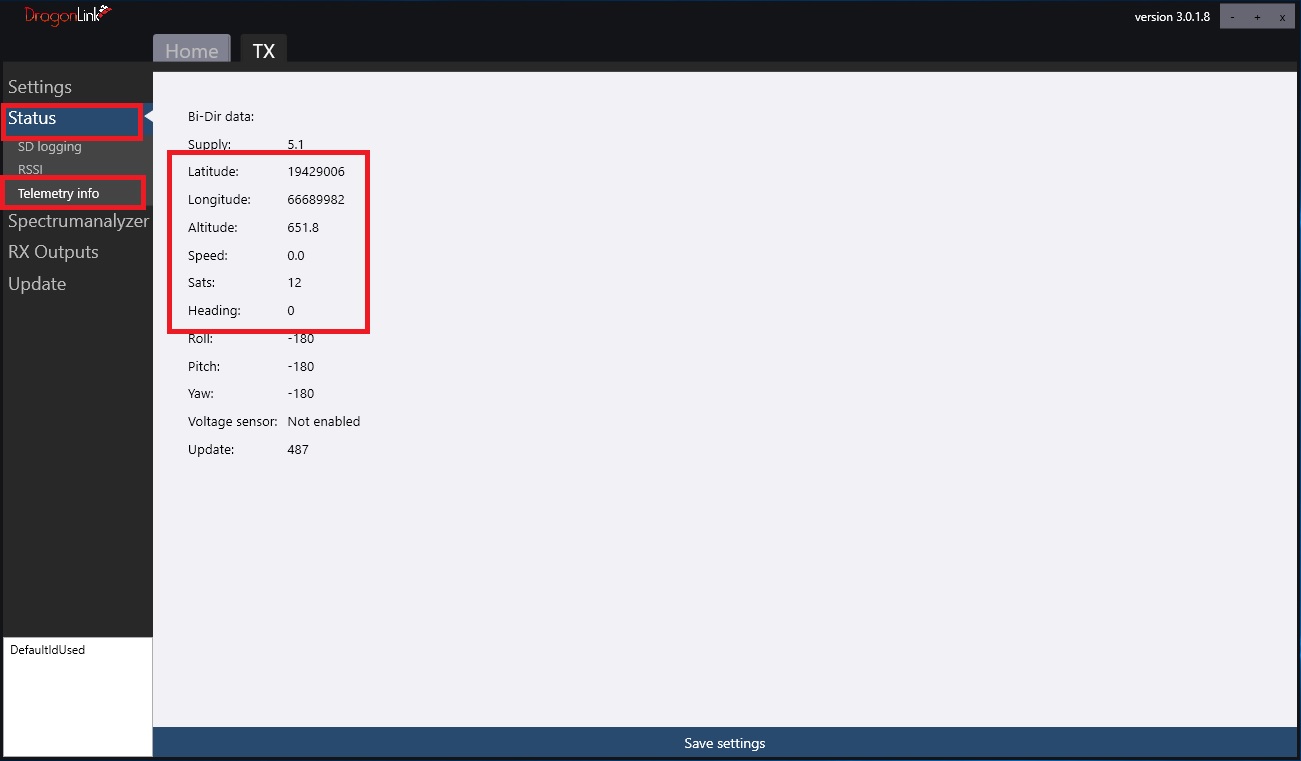
5. CONFIRM that telemetry is being received by the Dragon Link Transmitter by looking in the " Telemetry Info " section. You should see LAT and LONG, and other telemetry readouts as in the picture to the left. If you do NOT get this information, something is wrong and you must correct the problem before proceeding to the next step.
6. If you see the telemetry information in appearing in the Dragon Link transmitter GUI, then you can proceed to set up WiFi, Bluetooth, or whatever connection you want.
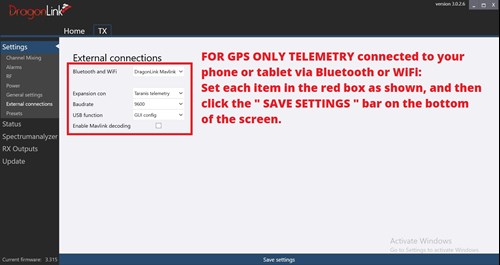
1. Connect your Dragon Link transmitter to the GUI configuration program, then click on " External Connections " to the left.
2. Set the items as follows:
Bluetooth and WiFi: DragonLink Mavlink
Expansion Con: Taranis Telemetry
Baudrate: 9600
USB Function: GUI Config
Enable Mavlink Decoding: Do NOT check the box !!!
3. Click the " SAVE SETTINGS " bar on the bottom.
4. Disconnect the USB cable from the Dragon Link transmitter.
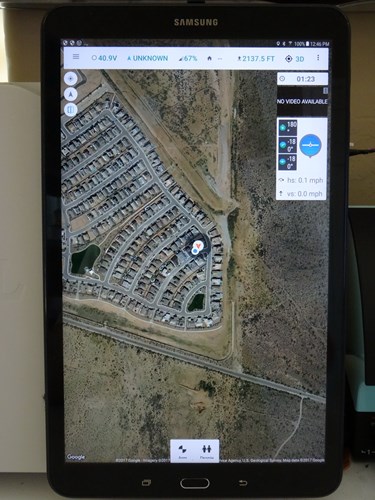
1. Connect your Dragon Link transmitter wireless to your phone or tablet using WiFi or Bluetooth.
FOR WiFi: Bring up a list of available networks, and chose " DragonLink ". When asked for a password, enter "DragonLink"
FOR BLUETOOTH: Chose " DragonLink " from the list of available devices and Pair the connection.
2. Download and install the " Q GROUND CONTROL " from Google Play and install on your phone or tablet. For Windows computers download and install " MISSION PLANNER " software.
3. Open QGroundControl, and click the connection button. Chose either the WiFi or Bluetooth connection option you have connected to your phone in step 1.
BLUETOOTH: A Com port will appear, chose the correct com port.
WiFi: Chose TCP, then enter IP 198.162.1.1 Port 14550
3. You should now see the positions and other information on the map. There is NO REQUIREMENT to be connected to any kind of wireless network for GPS telemetry to work.
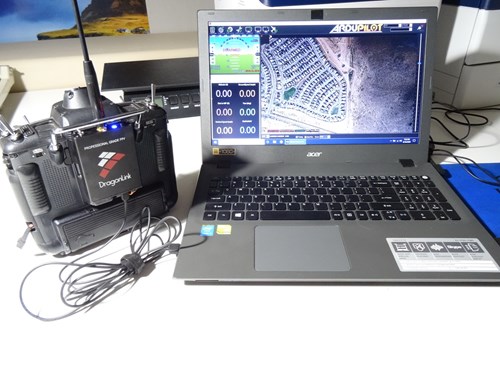
This step is NOT required, but if you are having trouble getting the WiFi or Bluetooth connected, you can test if telemetry is working by using a USB cable to You can connect your Dragon Link transmitter directly to your laptop.
1. Connect your Dragon Link Transmitter to the Dragon Link Transmitter Configuration program, and click on the " External Connections " tab on the left of the screen. You will see a screen like in the picture on the left. Click the " USB Function" drop down menu, and choose " Dragon Link / Mavlink " The drop down menu will turn RED, that is OK, click the " SAVE " button to save what you just did. The Dragon Link Transmitter will now output telemetry directly though the USB port.
2. Connect any standard USB cable to your Dragon Link USB port, and connect the other end to your tablet or computer. Configure your Tower software to get data from the USB port on your computer.
3. IMPORTANT !!!! WARNING !!!! Once you set the USB port on your Dragon Link to telemetry mode, it will NOT connect to your Dragon Link Transmitter configuration program, or firmware program, or even be recognized by your computer as normal. You must EXIT USB telemetry mode to use the Configuration Program again.
4. To EXIT USB Telemetry Mode: Push the " BIND " button down, and power on the Transmitter on, hold the button down until you get to the 5th menu option, which is a WHITE LED on the transmitter and release the button. This will set the USB port to normal mode to connect to your Dragon Link Transmitter Configuration program.