
If your Dragon Link transmitter was made JULY 2019 or later, and has the BLACK PCB part as shown in the picture to the left, your transmitter has the ESP32 WiFi + Bluetooth Module already built in. This gives you amazing capabilities to transmit telemetry information to any computer, tablet, or phone and display it on programs such as Mission Planner, QGroundControl, and more. The Dragon Link WiFi / Bluetooth has the following settings:
NAME: DragonLink PASSWORD: DragonLink
IP ADDRESS: 192.168.1.1 PORT: 14550
BLUETOOTH: Pair to " DragonLink "
WiFi FIRMWARE UPDATE: ONLY NEEDED FOR SYSTEMS SHIPPED IN 2019
This WiFi firmware is separate and different than the Dragon Link system firmware update. The WiFi update is only needed for Dragon Link WiFi Transmitters shipped in 2019. If your Dragon Link Transmitter shipped 1 January 2020 or later, your system already has the latest WiFi firmware installed. STOP HERE, and do NOT attempt to update the WiFi firmware.
______________________________________________________
The latest version of the Dragon Link Transmitter firmware includes a menu-option that will allow the USB-connection to be used for updating firmware on built in ESP32 WiFi Module. DO NOT update the WiFi firmware on any transmitter shipped 1 January 2020 or later. This update is only needed for WiFi Transmitters shipped in 2019.
To update the firmware of the WiFi module ( does not update Dragon Link transmitter firmware ):
1. Download and unzip the update package in the link above.
2. Hold down the MENU button on the Dragon Link transmitter and power it on. Continue to hold down the button and wait for menu option #6 which will be 6 beeps and a solid LIGHT BLUE LED indication as in the picture to the left. Release the button when you see the LIGHT BLUE LED.
3. Connect the Dragon Link transmitter to your computer via the USB cable.
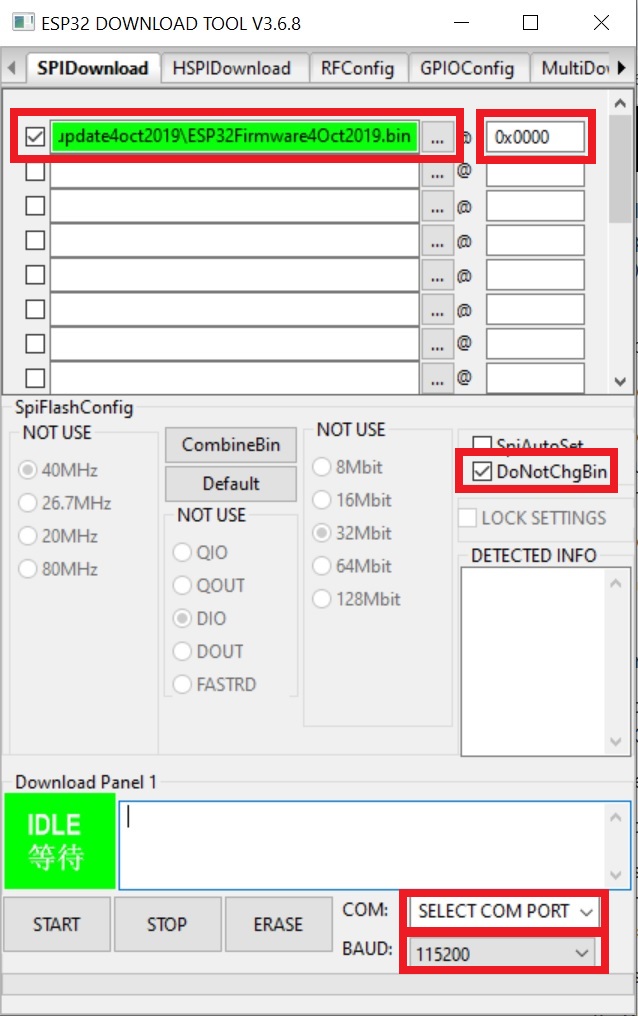
4. Run flash_download_tools, a couple of screens will open up. In the screen in the picture to the left select " ESP32 Download Tool.
5. Another screen will appear as in the picture to the left. Change the items in the RED BOXES as follows.
Check the small box top left, and then click the " .... " to the right to browse to the firmware file. When you click it, Browse to " ESP32Firmware4Oct2019 " and click OK, you will see it come up in the top box as shown in the picture.
In the small box on the top right, manually enter 0x0000 into the box as shown.
Check the " DoNotChgBin" box in the middle right
Chose the correct COM: from the list on the bottom right. Every computer assigns a different COM PORT, so it will probably be different from what you see in our example. Chose what comes up. If there is more than one listed, try each one until the update works.
Chose 115200 Baud
6. Click the START button on the bottom left and wait, the update process is SLOW. It will take about 10 seconds for the program to start reacting, but you should see the GREEN BOX that says " IDLE " change to " SYNC " for a few seconds, and then change to " DOWNLOAD " Once it goes to download, you will then the status bar on the very bottom will start slowly filling GREEN. It will take about 2 minutes to flash the module. If you do not see these things happening within 30 seconds, or get a different color error message in the green box on the left, then you need to correct your error and try again.
7. When complete, the green status box will change to " FINISH " and the status bar on the bottom will be FULL GREEN as shown in the picture to the left. You are now done and have a successful update. If you do not get these indications, or your update is NOT successful and you need to find the error and try again.